This page will serve as a tutorial for UF AGOL users who want to enable group editing of ArcGIS Online (AGOL). Multi-user editing a feature layer differs from group editing of a StoryMap (and other similar AGOL items like Dashboards and Experience Builder), so they are described separately.
By default, users in our org have the role of Publisher, this role will allow for the setup of group editing of a feature layer, but it will not allow for the setup of group editing of a story map. To create a group to be used for group editing of a StoryMap, special admin privileges are needed, these privileges are available with the Instructor, Researcher, or Students role (how to find your role). Please contact GeoPlan if you have the default Publisher role and need to be upgraded.
For our test, we used only users with the “publisher” role, which is the default role for all users in our main UF AGOL organizational account (org). All users in our test were part of the UF org.
Table of Contents
- Create a Feature Layer
- Group Setup for Multi-user Editing of Feature Class
- Testing your editing environment
- Notes and Gotchas
- Resources
Create a Feature Layer
First, you need to create a piece of content. For our test we added a feature class from a file geodatabase to ArcGIS Pro > share ribbon > share as web layer
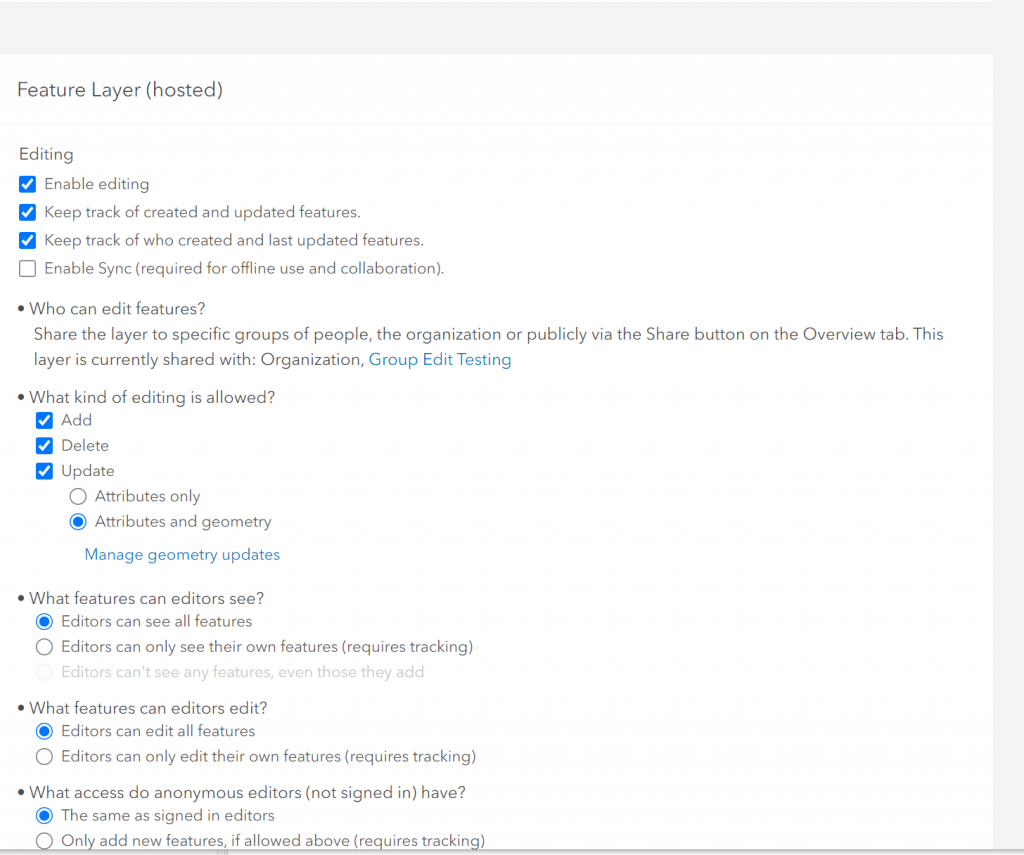
After the feature layer is in ArcGIS Pro you then need to make sure it has edit privileges. login to agol (open ufl.maps.arcgis.com) > content > click your feature layer > settings > make sure editing is enabled, here is what our editing settings look like:
Group Setup for Multi-User Editing of Feature Class
Now that you have a feature layer that is ready for editing, it’s time to create a group and add other org members to the group as well as add your feature layer to the group.
Group creation and settings
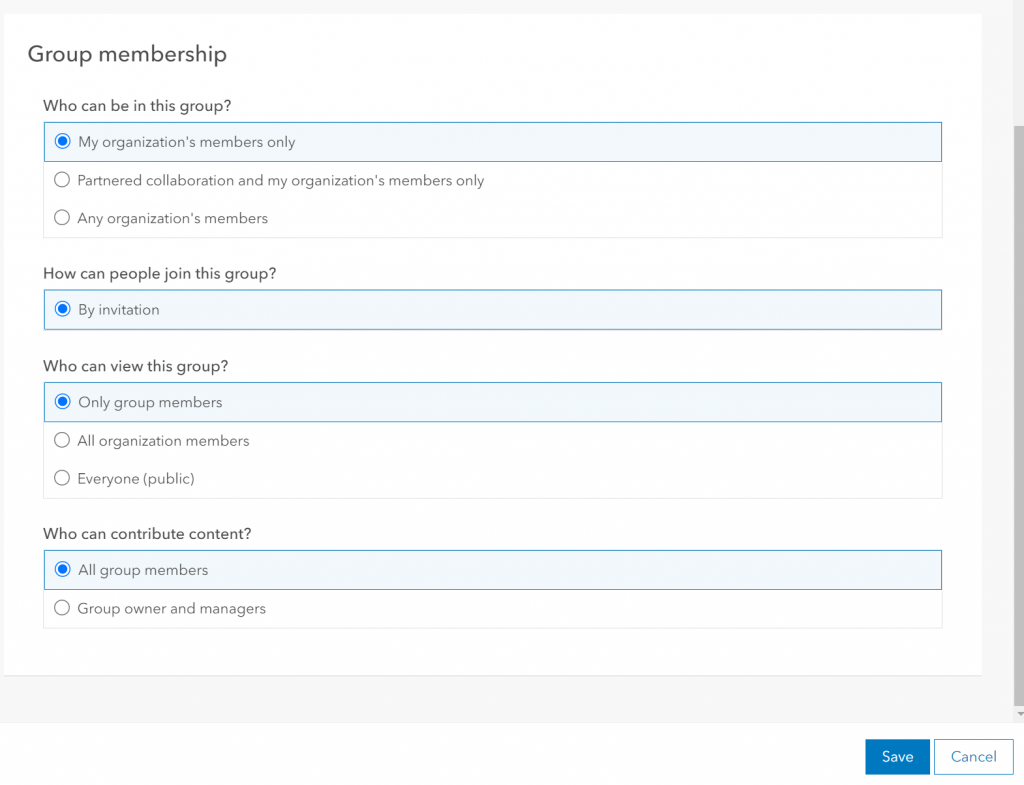
login to agol > groups > create group > make sure “all group members” is checked. here is what our group settings look like:
Add members to your group
login to agol > groups > click your group > invite users
Note: It may be necessary to create a new group, rather than edit the settings of an existing group. We have found issues with older groups that just won’t allow the group editing setting to work.
Add feature layer to your group
login to agol > content > click your feature layer > share > edit group sharing > check box next to appropriate group
Testing Your Editing Environment
open arcgis pro > map > add data > my content > choose layer that has been made available for group editing > edit
Notes and Gotchas
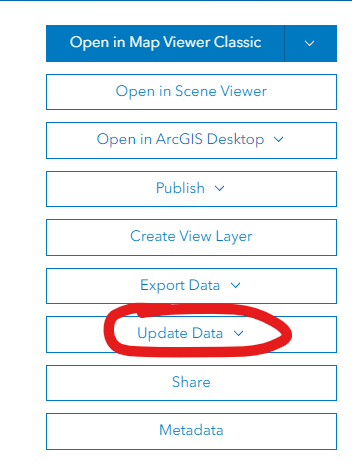
You can’t “Update” a layer that you don’t own. See screenshot:
If you need to jointly “Update”, consider updating all features using editing techniques in ArcGIS Pro, the other option is to transfer ownership from one user to another.
Sharing can be affected by group membership, organization membership, role, and settings on the feature layer. It can be tricky and create confusion, be sure to thoroughly test.
Resources
Here are some resources that can supplement the above:
Table of Contents
- Overview of Workflow
- Create StoryMap
- Group Setup for Story Map Collaboration
- Testing Your StoryMap
- Troubleshooting
- Resources
Overview of Workflow
To enable group editing on a StoryMap, you must make sure the following is true:
- A user with the Instructor, Researcher or Students role creates a group with the proper permissions
- All users that want to participate in group editing are added to the group
- The StoryMap is added as content to the group
Note: We have tested similar instructions for Dashboards, Experience Builder, and Web App Builder.
Create StoryMap
Create your StoryMap, you can get started with the creation here. This can be done with any role, including the default role of Publisher.
Group Setup for Story Map Collaboration
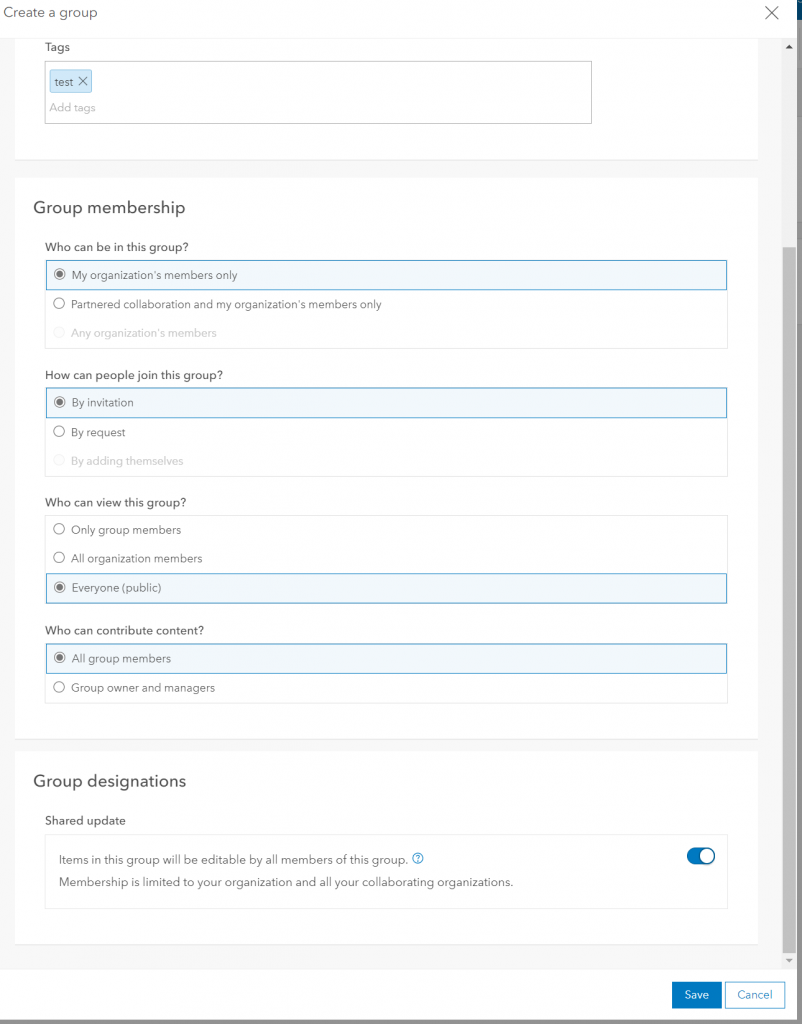
This has to be done with the Instructor, Researcher, or Students role. Make sure Who can contribute content and Group designations are enabled. See below for my test:
Notes:
- Once the group is created, you can’t go back and enable “Shared update”. You must create a new group and do it from the beginning.
- Some people miss the “Shared update” because it’s at the very bottom of the page, make sure you scroll all the way down!
- Note the difference between creating a group with the Instructor role vs the Publisher role. The extra “Group Designation > Shared update” is available.
Add members to your group
login to agol > groups > click your group > invite users’
Add StoryMap to your group
login to StoryMaps > My Stories > click story map > edit story > share settings > find group under group sharing > update sharing settings
Testing Your StoryMap
login to StoryMaps > My Stories > click story map > copy URL and send to collaborator
Troubleshooting
Have you followed these above instructions and still can’t have multiple editors? The most likely answer is that there are items in the story map that don’t have edit privileges enabled. We recommend starting with as few items as possible and making sure collaboration is working, before adding more items to your story.